
How to Add New Kindle to Your Kindle Account? [Full Guide!]
Disclosure: This post may contain affiliate links. I may get a commission if you decide to purchase through my links, at no additional cost to you.
So, you bought a new Kindle and you’re wondering how to add this newly purchased device to your existing Kindle account? Well, it is actually quite easy!
You can add a new Kindle to your account when purchasing it through Amazon by enabling the “Link device to your Amazon” option. Alternatively, you can register your Kindle during the Kindle setup process on the physical device by using your Amazon credentials linked to your Kindle purchases.
In this article, I will walk you through each of the steps of the process so that you can register your Kindle and start reading your favorite books on your new Kindle. So, let’s get started!
Why Should You Add Your Kindle to Your Account?
Some of you may be wondering if it is even necessary to add your Kindle to your account? What if you have never had a Kindle account? Do you still need to add your device to your account. Let’s take a look at all these burning questions in this section.
There are several benefits to registering your Kindle to your Kindle account.
Adding Kindle to your Amazon account allows you to purchase books directly from your Kindle. Additionally, if you have registered your Kindle, it can help you retrieve the device if it is lost or stolen. Moreover, registering Kindle also allows you to download books that you’ve already purchased!
One thing to note here is that there is no such thing as a Kindle account. Typically, the Amazon account that you use for your Kindle is referred to as the Kindle account. For many people, the Kindle account may be the same as the one used for shopping on amazon. However, some people may have a dedicated Amazon account specifically used only for reading books on Kindle.
For the purpose of this article, we will be using the terms Kindle Account and Amazon Account interchangeably.
Can You Use Kindle Without Adding it to Your Kindle Account?
You can use a Kindle without registering or adding it to your account. However, you won’t be able to transfer books directly to your Kindle as soon as you purchase them. You will need to sideload the Kindle books via USB or transfer books using the send-to-kindle email address.
While sideloading books using a USB drive will work for non Kindle books, to read Kindle books that you’ve purchased, you will need to be signed into your Kindle account on your device at all time (you don’t need to be connected to the internet but you need to be signed in to access the Kindle books that you’ve bought).
Kindle books are DRM protected. Meaning, Kindle books can be read by only those who have legitimately purchased the books on Amazon. The Kindle books get attached to your account, and thus it will open only when you are signed into the correct Amazon account on your Kindle.
Moreover, adding Kindle to your Amazon account is a quick process and is completely free! Let’s take a look at the complete process to add your Kindle to your account.
How to Add a New Kindle to Your Kindle Account?
Adding a Kindle to your Kindle account is actually quite simple and take just a few steps. There are two different ways you can add a Kindle to your account. Let’s take a look at both the different methods:
Method 1 – Registering Your Kindle at the Time of Purchase

This is perhaps the most straightforward method of adding a Kindle to your account.
When you are buying a Kindle, Amazon will typically ask you if you want to “Link device to your Amazon account“. This option is enabled by default and if you have purchased your Kindle from Amazon online, your Kindle will be automatically added to your account.
In the image above, I’m purchasing the Amazon’s newest model i.e. the Kindle Scribe, and I get to either enable or disable the option to link the device to my Amazon account.
In most cases, it is best to keep this box selected. However, there is a caveat. Don’t enable this box if you want to gift the Kindle to your dear one, or if you are buying a Kindle for someone else. Otherwise, the purchased Kindle will be registered to your account and the recipient may face issues when using it.
Method 2 – Using Your Kindle Device
Another way to add a new Kindle to your account is using the physical device. If you have not enabled the “Link the device to your Amazon account” setting at the time of the purchase, or if you have purchased the Kindle offline at a physical store, this is perhaps the best method to register your Kindle.
Follow the below mentioned steps to register your Kindle to your account:
- Turn on the device and begin the Kindle device setup process
- Enable the Wifi when prompted to do so. Make sure to connect to an existing wifi network.
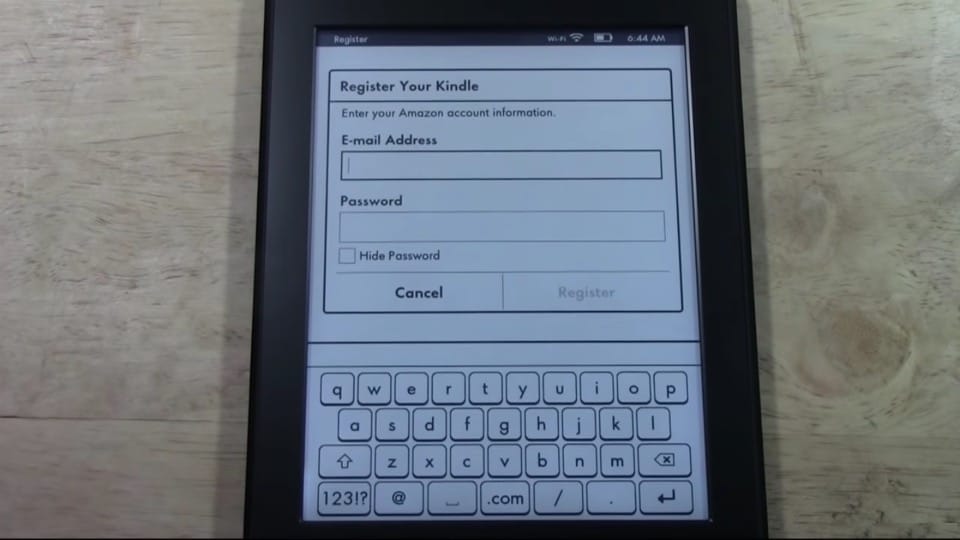
- Then, register your device. Make sure to choose the “using an existing Amazon account” option.
- Next, enter your email ID and password used for purchasing Kindle books on Amazon.
- If you don’t have an Amazon account, you can create a Kindle account using a web browser on your computer and then follow step 5. Alternatively, you can choose the “create an account” option and enter the account credentials.
- Finally, accept the terms and conditions and complete the registration process.
Once you’ve registered your new Kindle to your Kindle account, allow the device to sync all the files from your Kindle library. In a few minutes, you should be able to access the books that you’ve previously purchased from your account.
How to Add a New Kindle to Your Account Without an Internet Connection?
If you don’t have an wifi at home, I would recommend either using a hotspot from your phone or requesting a friend or a neighbor to allow you to use their wifi for once.
If, in an unlikely scenario, you just can’t get your hands on an internet connected for your Kindle, Amazon allows you to add your Kindle to your account by calling their customer service department.
To add a new Kindle to your account without an internet connection, first identify the serial number of your device. Then, call the Amazon customer service team on 1-866-206-1072 or connect with them over a chat and request them to register your device to your account.
However, make sure you have identified the serial number of your device before you reach out to the customer service team as they will ask you to call back once you have the serial number if you don’t have it handy.
You can find the serial number of the device on the bill that came with the device. Alternatively, you can locate the serial number of your Kindle by tapping on the “Settings” tab. Then, select the “Device Options” and tap on the “Device Info” button.
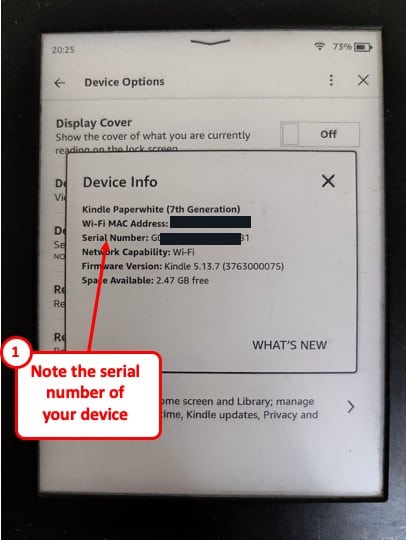
Make a note of the serial number of the device from the pop-up that appears on your screen (as shown in the image above).
Finally, once you have identified the serial number, reach out to the Amazon customer service team. Dial the number that I’ve shared above (I’ve personally tried this number and it works).
If you can’t get through to the Amazon customer service team for some reason, follow the suggestions in this article. The tips shared in that article are really helpful and allowed me to get in touch with the right Amazon team without much of a wait time.
Can You Add a Kindle to Your Account Using a Computer?
Unfortunately, you can’t add a new Kindle device to your Amazon account using a computer once you’ve purchased the device. You can either link the Kindle to your account at the time of the purchase, follow the registration process on the physical device, or contact the customer support team.
That said, once you have the device added to your Amazon account, you do have the option to manage your device using the “content and devices” option on Amazon. You can even de-register your Kindle using your Amazon account.
However, registration of a new device is not allowed on Amazon (unless it is through the link the device to my account option at the time of purchasing the device on Amazon).
Credit to @felipepelaquim on Unsplash for the featured image of this article.

![Why Is Amazon Gift Card Locked? [Here’s What to Know!]](https://curiouscustomer.com/wp-content/uploads/2022/12/male-programmer-stressed-out-at-work-2022-01-19-00-21-49-utc-768x512.jpeg)
![Do Kindles Have Blue Light? Is It Harmful? [Full Guide!]](https://curiouscustomer.com/wp-content/uploads/2022/10/young-woman-rubs-her-eyes-after-using-glasses-eye-2022-02-16-17-25-57-utc-768x512.jpeg)
![How Long Does Kindle Battery Last? [Guide for All Models!]](https://curiouscustomer.com/wp-content/uploads/2022/10/Kindle-on-the-desk-optimized-768x512.jpeg)